Saturday, 17 November 2012

Candy melt buttons

I was recently asked to bake a cake and cupcakes for a friend's God son's christening. She had no requirements other than the amount of cake, so I had free reign to come up with an idea. I had seen (and bought) some lovely chocolate buttons that looked like real buttons, and thought it would be lovely if I could make some coloured ones. (The ones I bought before were from Vintage Chocolate buttons by Hotel Chocolat, and they make lovely gifts.

So, with my friend's approval, I ordered a silicone mould tray from eBay to make my coloured buttons and two bags of Candy Melts - one blue, one bright green. Candy Melts are super easy to use - just melt them like ordinary chocolate. I did mine in a bowl over a pan of simmering water. The first batch I made I used a teaspoon to put the melted Candy into the mould, but this meant the first few had bubbles of air trapped at the bottom/top of the button. 


You can see the air bubbles in this first batch.

So, the second batch, I used a paintbrush from my cake decorating kit to fill the mould slowly, making sure the Candy Melt went to all the edges of each button leaving no bubble holes. I used the back of a dinner knife to level each button off, as some of these will sit flat on the top of the main cake.


I'm really pleased with the results of these buttons. I've used silicone moulds before, but individual ones, which I've pressed sugarpaste into and turned out to leave to set. This way is so much quicker, especially as the Candy Melts only take a matter of minutes to set. Highly recommended. 

Selection of green and blue Candy Melt buttons.

Update: I thought you'd like to see the buttons finished on the cakes. I used the bigger ones on their own on a cupcake, and the smaller ones as toppers for the larger cake. I think they look quite effective, and I'm very pleased!

Chocolate cupcakes with vanilla buttercream, and a Candy Melt button!

6 inch chocolate cake with cherry jam and vanilla buttercream filling, sugarpaste icing, and Candy Melt button decorations. 


Sunday, 11 November 2012

The 2012 Christmas Cake

For the first time this year, I have baked my own Christmas cake. This year, I am doing a cake decorating class at a local college, and the end result is to have our own Christmas cakes iced to our own design. This will show off all the techniques we have learned, and I have lots of ideas for mine (which I have to have settled on by this Thursday! I'm not good at decisions!).

But the first thing we had to do, was bake our cake. Our tutor gave us a recipe, but I found another I wanted to try which was the Bettys Tearoom recipe. You can find it online here along with their Christmas pudding recipe.

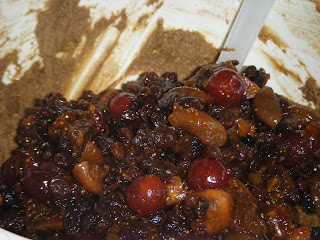
I altered the recipe slightly, because I fancied putting in some different fruit, and I also wanted to use rum. Partly because this is mine and my boyfriend's preferred spirit, and partly because I already had some in! (I originally wanted to use amaretto but didn't have any). So, I soaked figs, dates, raisins and glace cherries with the zest and juice listed, and quite a lot more than the amount of alcohol stated! I left this for a few days before using it.

The rum soaked fruit added to the cake batter

I'll be truthful here - this was the second cake I made. I had a baking disaster with the first one. I was reading the recipe off my netbook screen, so had to keep scrolling up and down to get the quantities needed for each step. Which was fine, until I forgot to check when I got to the instruction "add the beaten egg" and only added one. There was meant to be three. Suffice to say it was very thick, and didn't "set" properly even after 3 hours of baking! So I had to chuck that one out and start again.

Here it is before baking:
All ready for the oven.

Unfortunately I forgot to take a photo of it once I took it out, but it went a lovely deep brown colour, and very shiny on top. Quite moist looking too. Yum!

Last Thursday we covered our cakes with marzipan, and some of the girls had to trim their cakes flat. Most of them had used the recipe our tutor had given them, but not one of us had followed our recipes to the letter, and everyone had used different fruit and alcohol. All were delicious, and we had to stop ourselves scoffing all the scraps. Our tutor has taken the crumbs away to make us some christmas cake truffles, so we're looking forward to Thursday!

So for now, here is my cake. I will post again once I've fully decorated it, and maybe, if you're lucky, I'll post a picture of once it's cut!