Tuesday, 1 January 2013

Felted slippers

When you think of knitting, slippers are probably not the first things you think of. But that's exactly what I ended up making for two people this Christmas (although one pair was actually a December birthday present to be fair).

As with a lot of my knitted items so far, I searched Ravelry for slipper patterns, and found this fabulous pattern by DROPS Design. 

I have never (deliberately) tried felting. (I did once manage to half felt a cashmere jumper by putting it in a normal wash cycle in the machine, but I don't think that counts!). Usually with a pattern I would try and find a yarn similar to the suggested one not necessarily the exact one, but because this was a new technique, I decided to try and find the suggested yarn. I went to Purl City Yarns in Manchester, but unfortunately they no longer stock DROPS, but the lady in the shop helpfully pointed me in the direction of an online stockist, The Crochet Chain, which many of their customers have used in the past. 

The Crochet Chain specialises in DROPS wool, and the best thing about their website is that it tells you which yarns are good for what type of knitting. In particular it told me which yarns were good for felting, and this was very useful as the exact brand was out of stock in the colours I had decided on! In the end I chose Andes, a gorgeously soft wool/alpaca mix. 

The slippers were knit flat in one piece, using 10mm needles and double thickness of yarn. This meant that it knit in super quick time. This is the largest needle I've used so far, but it wasn't any more difficult. 

Red slippers knitted flat in one piece per slipper.
Once the slippers were knitted, the sides were folded inwards and the seam knitted up the middle, and the toe seam. The back edge was also folded in and sewn tightly.

Red Slippers seamed and ready for felting.
Once they were sewn up, they were ready to go in the washing machine to be felted. I washed each pair on their own, with a towel to give something to help the felting along (friction), using non-bio washing powder on a 30 degree wash. I then left them to dry in front of the radiator to help them dry quicker. (Partly because I left both pairs to the last minute! This is typical of me.)

As a final flourish, I added a pom pom to each which I made by wrapping wool around three of the fingers on my left hand, tying in the middle and trimming until it was perfectly round. These were then sewn on to the top of each slipper. 

I was really pleased with the end result, and may even make some more in the future.

Pink slippers, ready to be given away!

Bedsocks for granny

I hadn't planned to knit for my Granny this year, but at the same time I couldn't think of what I could give her. Then my Uncle suggested she might like a pair of bedsocks, and after having a quick look on Ravelry, I found a really cute pair of bedsocks which were like large booties. 

The pattern I used can be found here. Because I wanted a size smaller, I decided to use double knitting rather than the worsted/aran weight suggested in the pattern. As the designer said that the pattern was forgiving and would stretch, I decided this would be OK.

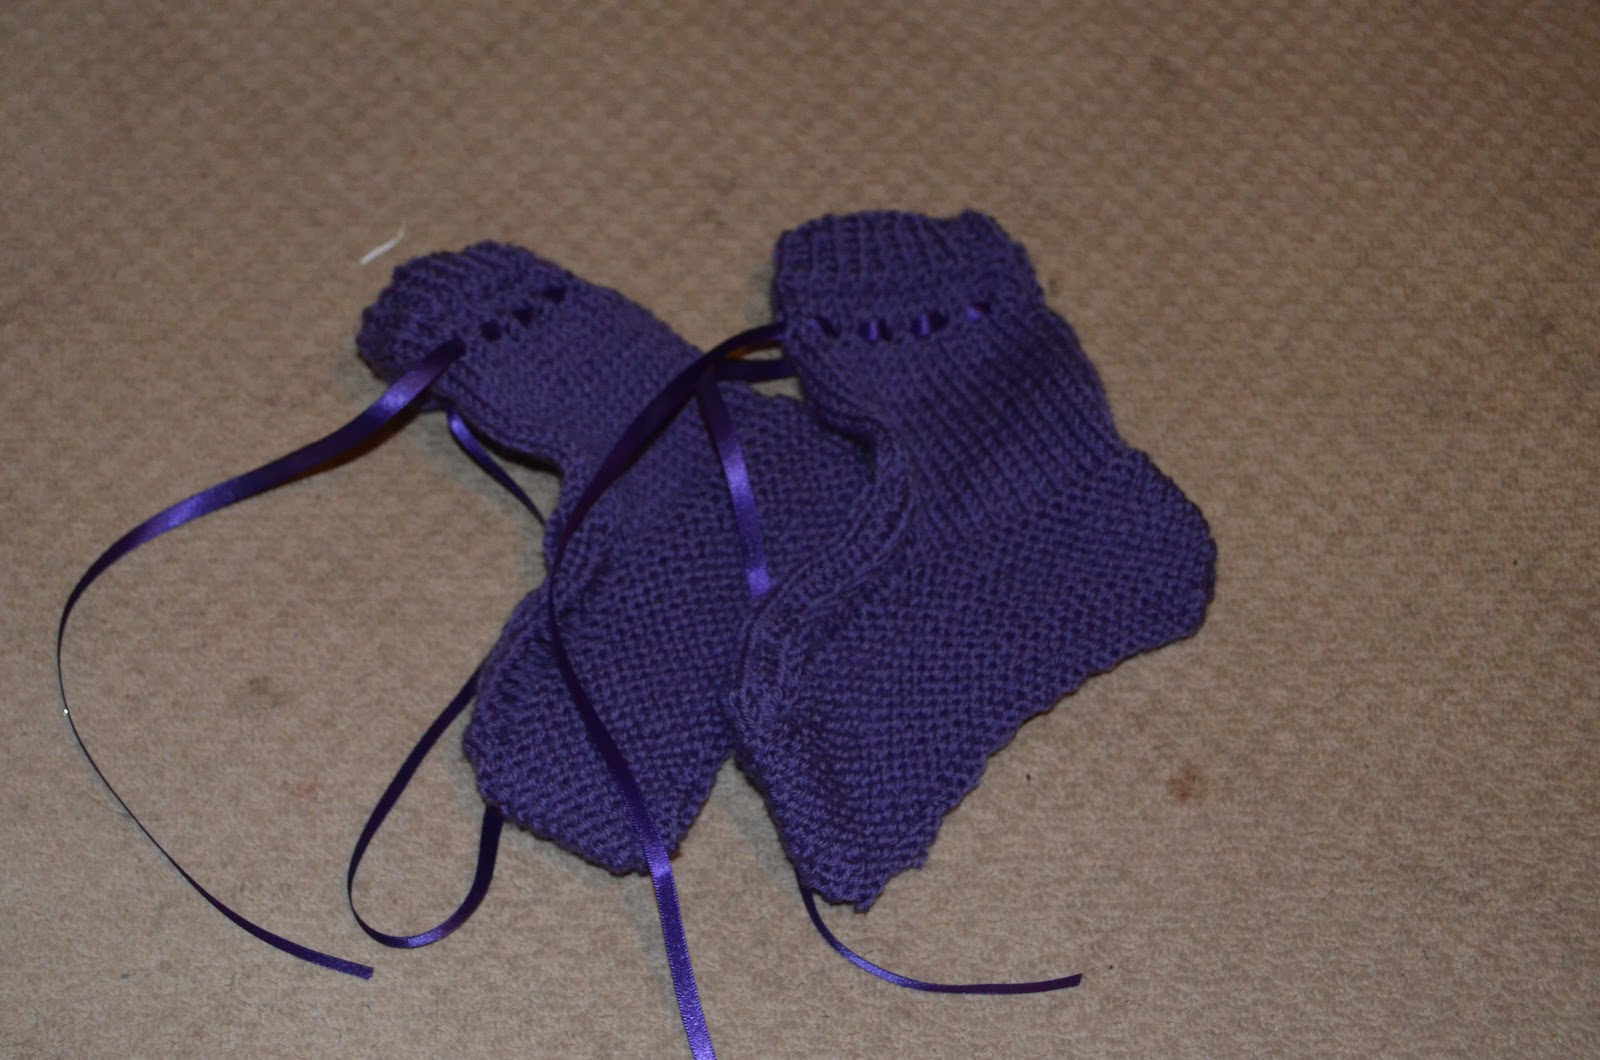
The wool for these came from Purl City Yarns in Manchester, and I chose a lovely purple double knit wool by Adriafil. This is a standard wool/acrylic mix and so can be machine washed without any special instruction. 

The "booties" were knit up flat in one piece, and seamed using kitchener stitch for the sole and mattress stitch up the back. It was my first time using kitchener stitch but it turned out well. The design also called for making eyelets as you knit, which were made by using k2tog and yo (knit two together, and yarn over the needle if you're not a knitter!).

I was very pleased with the results, and after adding a ribbon to tie them snugly round the ankle they were ready to go. Hopefully they will keep Granny's toes snug!

Granny's knitted bedsocks

Wristlets for Christmas

I've said it before but I'll say it again - one of the best bits of Christmas is making home made presents for everyone. Since knitting is my new "thing", I decided to make a lot of knitted presents this year, and these lovely wristlets were my favourite, and the easiest too!

I found a very simple pattern on Ravelry on which to base my wristlets, and decided early on that I would combine the simple plain design with the heart motif from another project (the heart Christmas bauble I made with a pattern from Let's Knit! magazine). I wanted to make these for three friends, mum, and a pair for myself.

I took a trip to one of my favourite wool shops - baa ram ewe in Headingley, Leeds - and chose three shades of gorgeous Debbie Bliss Cashmerino Aran (purple, gold, and a petrol blue), and added a ball in cream for the contrasting hearts. While I was there I spotted some beautiful Debbie Bliss Donegal Tweed Aran which I knew my Mum, who is also a crafter, would appreciate and chose a lovely blue shade.

The Cashmerino is a treat both to knit with and to wear. Beautifully silky soft, it is lovely to hold whilst knitting, and the items made out of it are lovely and warm. The Donegal Tweed Aran is less evenly spun than other yarn I've used, but still knitted the wristlets into a nice even-enough piece. The tweed effect is very pretty, and I like it so much that when we got given our Secret Santa people in work I decided to do another in a different colour for my recipient (they don't read my blog so the secret is still safe!). 

I only made one tiny change to the pattern to accommodate the pattern - the pattern fitted above the thumb hole, but needed an extra row before the ribbing to make sure that the top of the hearts had good definition. I found this out by making a practice version from some spare Aran I already had at home for another project. 

I also made a striped pair out of the remaining cashmerino (gold, blue, purple and cream), but I didn't get a photo of these or of my own which have been worn every day for 2 months now. They are so warm even though they are fingerless, and I think I'll be wearing these for some months to come too.

Gold wristlets in Cashmerino Aran being modelled by their recipient!

Blue wristlets in Donegal Tweed Aran, and petrol blue wristlets in Cashmerino Aran.

Sunday, 30 December 2012

Hello Kitty Hat

I'm not really much of a fan of cats (or rather they're not too fond of me!), and am definitely more of a little-dog person. Having said that, in a twist of logic, I am rather fond of Hello Kitty, and have a mini collection of things with her cute little face on.

My other half's neice is also a fan of Kitty, so when I stumbled upon a knitted Hello Kitty hat on Ravelry, I knew it would make the perfect Christmas present.

The hat itself is knitted in the round in chunky wool, making it super quick and easy to do, and I had it finished in one evening. Ears and now were done in another couple of evenings, and that just left making up. I must admit I put off making up til Christmas Eve (I started the hat in October), mainly because I was terrified I would mess up the little face and embroider an eye on wonky or something. As it turned out it wasn't as tricky as I thought, and I'm really happy with the way it turned out.

As is Ruby, who as you can see was delighted with her new hat! 


Kitty Hat ready for wrapping!!!
Ruby in her new hat (best photo we could get of both!).


Tuesday, 25 December 2012

Merry Christmas Cake!!!

I like love cake! Most of you will already know this, and many of you will also know that this year I decided to formally expand my skills by joining a Cake Decorating course at Trafford College. It was a 10 week course which gave us the basic skills needed for cake decorating including piping skills, covering a cake (properly rather than my bodge job!) and some modelling.

It was a practical hands on course, and during the ten weeks we developed the required skills to design and ice a Christmas cake. First job though - inspiration!

I had a couple of ideas, and I gathered the inspiration around my ideas on this Pinterest board. I started with the idea of recreating this year's Cath Kidston Christmas Tree and deer design, but decided the legs on the deer might mean I struggled to get the little guy to stand up. (However, since then I found the final pin on my Pinterest board which shows a lovely little model deer which I may have to try next year). 

My next idea was to keep with the theme of animals and Christmas trees, but this time maybe a rabbit. I must admit my inspiration for this one was memories of the gorgeous bunnies in "Wallace and Gromit and the Curse of the Were-Rabbit" and so I pinned a couple of pictures of these to my Pinterest inspiration board. 

I also found a few cakes with ponds or ice rinks on, and as we'd done inlay work on the course (a new trend in cake decorating) I decided this would be the direction I would go in. I also decided to use this idea to demonstrate my piping skills.

I've previously blogged about making the cake so you will know it is a large cake. I thought about adding a design to the side of the cake, but in the end decided to go traditional, so I crimped the board, added holly and berries, and crimped the top edge of the cake too. Once I'd finished the design on the top, I decided it was a bit plain, so I painted the crimp red to balance the colours out.

And there we have it. My cake! I hope you like it. How on earth will I bring myself to cut it!?!?

Merry Christmas bunny!

Giving the "Dancing on Ice" celebs tips on how it's done!
Merry Christmas Everyone!

Saturday, 17 November 2012

Candy melt buttons

I was recently asked to bake a cake and cupcakes for a friend's God son's christening. She had no requirements other than the amount of cake, so I had free reign to come up with an idea. I had seen (and bought) some lovely chocolate buttons that looked like real buttons, and thought it would be lovely if I could make some coloured ones. (The ones I bought before were from Vintage Chocolate buttons by Hotel Chocolat, and they make lovely gifts.

So, with my friend's approval, I ordered a silicone mould tray from eBay to make my coloured buttons and two bags of Candy Melts - one blue, one bright green. Candy Melts are super easy to use - just melt them like ordinary chocolate. I did mine in a bowl over a pan of simmering water. The first batch I made I used a teaspoon to put the melted Candy into the mould, but this meant the first few had bubbles of air trapped at the bottom/top of the button. 


You can see the air bubbles in this first batch.

So, the second batch, I used a paintbrush from my cake decorating kit to fill the mould slowly, making sure the Candy Melt went to all the edges of each button leaving no bubble holes. I used the back of a dinner knife to level each button off, as some of these will sit flat on the top of the main cake.


I'm really pleased with the results of these buttons. I've used silicone moulds before, but individual ones, which I've pressed sugarpaste into and turned out to leave to set. This way is so much quicker, especially as the Candy Melts only take a matter of minutes to set. Highly recommended. 

Selection of green and blue Candy Melt buttons.

Update: I thought you'd like to see the buttons finished on the cakes. I used the bigger ones on their own on a cupcake, and the smaller ones as toppers for the larger cake. I think they look quite effective, and I'm very pleased!

Chocolate cupcakes with vanilla buttercream, and a Candy Melt button!

6 inch chocolate cake with cherry jam and vanilla buttercream filling, sugarpaste icing, and Candy Melt button decorations. 


Sunday, 11 November 2012

The 2012 Christmas Cake

For the first time this year, I have baked my own Christmas cake. This year, I am doing a cake decorating class at a local college, and the end result is to have our own Christmas cakes iced to our own design. This will show off all the techniques we have learned, and I have lots of ideas for mine (which I have to have settled on by this Thursday! I'm not good at decisions!).

But the first thing we had to do, was bake our cake. Our tutor gave us a recipe, but I found another I wanted to try which was the Bettys Tearoom recipe. You can find it online here along with their Christmas pudding recipe.

I altered the recipe slightly, because I fancied putting in some different fruit, and I also wanted to use rum. Partly because this is mine and my boyfriend's preferred spirit, and partly because I already had some in! (I originally wanted to use amaretto but didn't have any). So, I soaked figs, dates, raisins and glace cherries with the zest and juice listed, and quite a lot more than the amount of alcohol stated! I left this for a few days before using it.

The rum soaked fruit added to the cake batter

I'll be truthful here - this was the second cake I made. I had a baking disaster with the first one. I was reading the recipe off my netbook screen, so had to keep scrolling up and down to get the quantities needed for each step. Which was fine, until I forgot to check when I got to the instruction "add the beaten egg" and only added one. There was meant to be three. Suffice to say it was very thick, and didn't "set" properly even after 3 hours of baking! So I had to chuck that one out and start again.

Here it is before baking:
All ready for the oven.

Unfortunately I forgot to take a photo of it once I took it out, but it went a lovely deep brown colour, and very shiny on top. Quite moist looking too. Yum!

Last Thursday we covered our cakes with marzipan, and some of the girls had to trim their cakes flat. Most of them had used the recipe our tutor had given them, but not one of us had followed our recipes to the letter, and everyone had used different fruit and alcohol. All were delicious, and we had to stop ourselves scoffing all the scraps. Our tutor has taken the crumbs away to make us some christmas cake truffles, so we're looking forward to Thursday!

So for now, here is my cake. I will post again once I've fully decorated it, and maybe, if you're lucky, I'll post a picture of once it's cut!