Showing posts with label Home-made. Show all posts

Thursday, 24 January 2013

My first fondant fancies

Earlier this month, we went to visit some friends in their new house, and as they'd helped me out with some graphic design earlier in the year, I'd promised them some cake. I usually bake cupcakes, but this time I wanted to try something new. 

Earlier this year, I enjoyed watching the latest series of the Great British Bake Off, and one of the challenges in the final was fondant fancies. Even though the technique they used for the icing looked a bit faffy (slightly dissolving a block of fondant icing so it became runny), I decided I'd really like a go at making my own, and when the GBBO book came out, I just had to try the recipe for the fondant fancies.

The recipe is for a delicious orange and cardamom flavoured cake with a delicately flavoured orange icing. I'd never made a genoise cake before, and other than the time it takes to get the eggs nice and fluffy, it was pretty simple to do. I ended up with a few lumps of flour because I disobeyed one of the instructions, but they weren't noticeable to eat, and I've learnt my lesson to follow the recipe more closely!

The cake was made on a Friday evening, as I'd read a tip from Mary Berry on the BBC Food website to make the cake the night before so it was less crumbly. I then prepared the marzipan for the top in the morning, and iced on Saturday afternoon. The only trouble I had was I made the icing slightly too runny. This meant that once it had dripped off, it was quite thin and you could see the cake through it. Next time I will trust a thicker icing to spread over the cake more slowly.


My little fondant fancies iced and ready to go.
But, once they were in their paper cases, packed in to a box (12 of these fit perfectly into a 6 cupcake box without the holder in), they look really lovely.


All boxed up and ready to go!
The basic recipe seems like it would be easy to adapt to other flavours, and I'm already planning my next batch. Watch this space...

Tuesday, 1 January 2013

Camelia blanket - part 1: The beginning

Now Christmas is out of the way for another year, and 2013 has arrived, I've started planning some craft projects just for me (I know, I know - crazy!). As well as finishing a sleeveless cardigan/waistcoat I started knitting back in September, and a lovely jumper I've seen to make use of some wool I fell in love with on holiday, I also plan on getting back to a big project I started earlier this year.

Knowing we were going on the canal for our holiday this year, I decided I'd take some crochet to keep me occupied (when I wasn't doing locks or bridges). Rather than take a teeny little project, I decided to tackle my very favourite project from my crochet book (Cute and Easy Crochet, by Nikki Trench), which is... a blanket!!! It's the Camelia Blanket, and will be a gorgeous snug blanket for my bed or snuggling on the sofa.

I started it in August, a few weeks before the holiday, and I'm sure I'll still be going this time next year (and probably even longer), as I moved on to Christmas projects in October!

The blanket has a mixture of 'plain' Granny squares and squares with a three dimensional camelia. I've done about 17 squares now, and as there's 142 squares on the blanket there's still some way to go...


Felted slippers

When you think of knitting, slippers are probably not the first things you think of. But that's exactly what I ended up making for two people this Christmas (although one pair was actually a December birthday present to be fair).

As with a lot of my knitted items so far, I searched Ravelry for slipper patterns, and found this fabulous pattern by DROPS Design. 

I have never (deliberately) tried felting. (I did once manage to half felt a cashmere jumper by putting it in a normal wash cycle in the machine, but I don't think that counts!). Usually with a pattern I would try and find a yarn similar to the suggested one not necessarily the exact one, but because this was a new technique, I decided to try and find the suggested yarn. I went to Purl City Yarns in Manchester, but unfortunately they no longer stock DROPS, but the lady in the shop helpfully pointed me in the direction of an online stockist, The Crochet Chain, which many of their customers have used in the past. 

The Crochet Chain specialises in DROPS wool, and the best thing about their website is that it tells you which yarns are good for what type of knitting. In particular it told me which yarns were good for felting, and this was very useful as the exact brand was out of stock in the colours I had decided on! In the end I chose Andes, a gorgeously soft wool/alpaca mix. 

The slippers were knit flat in one piece, using 10mm needles and double thickness of yarn. This meant that it knit in super quick time. This is the largest needle I've used so far, but it wasn't any more difficult. 

Red slippers knitted flat in one piece per slipper.
Once the slippers were knitted, the sides were folded inwards and the seam knitted up the middle, and the toe seam. The back edge was also folded in and sewn tightly.

Red Slippers seamed and ready for felting.
Once they were sewn up, they were ready to go in the washing machine to be felted. I washed each pair on their own, with a towel to give something to help the felting along (friction), using non-bio washing powder on a 30 degree wash. I then left them to dry in front of the radiator to help them dry quicker. (Partly because I left both pairs to the last minute! This is typical of me.)

As a final flourish, I added a pom pom to each which I made by wrapping wool around three of the fingers on my left hand, tying in the middle and trimming until it was perfectly round. These were then sewn on to the top of each slipper. 

I was really pleased with the end result, and may even make some more in the future.

Pink slippers, ready to be given away!

Bedsocks for granny

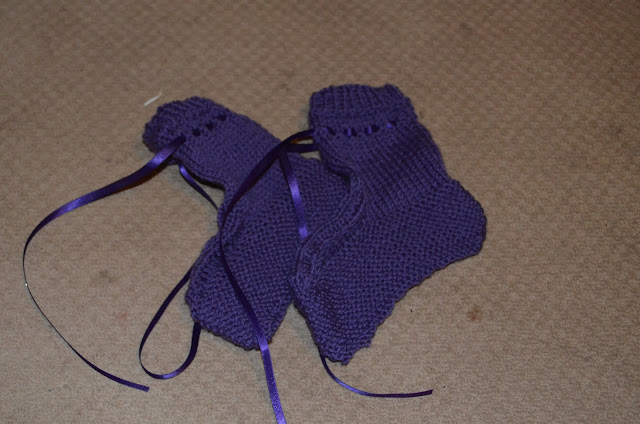
I hadn't planned to knit for my Granny this year, but at the same time I couldn't think of what I could give her. Then my Uncle suggested she might like a pair of bedsocks, and after having a quick look on Ravelry, I found a really cute pair of bedsocks which were like large booties. 

The pattern I used can be found here. Because I wanted a size smaller, I decided to use double knitting rather than the worsted/aran weight suggested in the pattern. As the designer said that the pattern was forgiving and would stretch, I decided this would be OK.

The wool for these came from Purl City Yarns in Manchester, and I chose a lovely purple double knit wool by Adriafil. This is a standard wool/acrylic mix and so can be machine washed without any special instruction. 

The "booties" were knit up flat in one piece, and seamed using kitchener stitch for the sole and mattress stitch up the back. It was my first time using kitchener stitch but it turned out well. The design also called for making eyelets as you knit, which were made by using k2tog and yo (knit two together, and yarn over the needle if you're not a knitter!).

I was very pleased with the results, and after adding a ribbon to tie them snugly round the ankle they were ready to go. Hopefully they will keep Granny's toes snug!

Granny's knitted bedsocks

Wristlets for Christmas

I've said it before but I'll say it again - one of the best bits of Christmas is making home made presents for everyone. Since knitting is my new "thing", I decided to make a lot of knitted presents this year, and these lovely wristlets were my favourite, and the easiest too!

I found a very simple pattern on Ravelry on which to base my wristlets, and decided early on that I would combine the simple plain design with the heart motif from another project (the heart Christmas bauble I made with a pattern from Let's Knit! magazine). I wanted to make these for three friends, mum, and a pair for myself.

I took a trip to one of my favourite wool shops - baa ram ewe in Headingley, Leeds - and chose three shades of gorgeous Debbie Bliss Cashmerino Aran (purple, gold, and a petrol blue), and added a ball in cream for the contrasting hearts. While I was there I spotted some beautiful Debbie Bliss Donegal Tweed Aran which I knew my Mum, who is also a crafter, would appreciate and chose a lovely blue shade.

The Cashmerino is a treat both to knit with and to wear. Beautifully silky soft, it is lovely to hold whilst knitting, and the items made out of it are lovely and warm. The Donegal Tweed Aran is less evenly spun than other yarn I've used, but still knitted the wristlets into a nice even-enough piece. The tweed effect is very pretty, and I like it so much that when we got given our Secret Santa people in work I decided to do another in a different colour for my recipient (they don't read my blog so the secret is still safe!). 

I only made one tiny change to the pattern to accommodate the pattern - the pattern fitted above the thumb hole, but needed an extra row before the ribbing to make sure that the top of the hearts had good definition. I found this out by making a practice version from some spare Aran I already had at home for another project. 

I also made a striped pair out of the remaining cashmerino (gold, blue, purple and cream), but I didn't get a photo of these or of my own which have been worn every day for 2 months now. They are so warm even though they are fingerless, and I think I'll be wearing these for some months to come too.

Gold wristlets in Cashmerino Aran being modelled by their recipient!

Blue wristlets in Donegal Tweed Aran, and petrol blue wristlets in Cashmerino Aran.

Sunday, 30 December 2012

Hello Kitty Hat

I'm not really much of a fan of cats (or rather they're not too fond of me!), and am definitely more of a little-dog person. Having said that, in a twist of logic, I am rather fond of Hello Kitty, and have a mini collection of things with her cute little face on.

My other half's neice is also a fan of Kitty, so when I stumbled upon a knitted Hello Kitty hat on Ravelry, I knew it would make the perfect Christmas present.

The hat itself is knitted in the round in chunky wool, making it super quick and easy to do, and I had it finished in one evening. Ears and now were done in another couple of evenings, and that just left making up. I must admit I put off making up til Christmas Eve (I started the hat in October), mainly because I was terrified I would mess up the little face and embroider an eye on wonky or something. As it turned out it wasn't as tricky as I thought, and I'm really happy with the way it turned out.

As is Ruby, who as you can see was delighted with her new hat! 


Kitty Hat ready for wrapping!!!
Ruby in her new hat (best photo we could get of both!).


Tuesday, 25 December 2012

Merry Christmas Cake!!!

I like love cake! Most of you will already know this, and many of you will also know that this year I decided to formally expand my skills by joining a Cake Decorating course at Trafford College. It was a 10 week course which gave us the basic skills needed for cake decorating including piping skills, covering a cake (properly rather than my bodge job!) and some modelling.

It was a practical hands on course, and during the ten weeks we developed the required skills to design and ice a Christmas cake. First job though - inspiration!

I had a couple of ideas, and I gathered the inspiration around my ideas on this Pinterest board. I started with the idea of recreating this year's Cath Kidston Christmas Tree and deer design, but decided the legs on the deer might mean I struggled to get the little guy to stand up. (However, since then I found the final pin on my Pinterest board which shows a lovely little model deer which I may have to try next year). 

My next idea was to keep with the theme of animals and Christmas trees, but this time maybe a rabbit. I must admit my inspiration for this one was memories of the gorgeous bunnies in "Wallace and Gromit and the Curse of the Were-Rabbit" and so I pinned a couple of pictures of these to my Pinterest inspiration board. 

I also found a few cakes with ponds or ice rinks on, and as we'd done inlay work on the course (a new trend in cake decorating) I decided this would be the direction I would go in. I also decided to use this idea to demonstrate my piping skills.

I've previously blogged about making the cake so you will know it is a large cake. I thought about adding a design to the side of the cake, but in the end decided to go traditional, so I crimped the board, added holly and berries, and crimped the top edge of the cake too. Once I'd finished the design on the top, I decided it was a bit plain, so I painted the crimp red to balance the colours out.

And there we have it. My cake! I hope you like it. How on earth will I bring myself to cut it!?!?

Merry Christmas bunny!

Giving the "Dancing on Ice" celebs tips on how it's done!
Merry Christmas Everyone!

Saturday, 17 November 2012

Candy melt buttons

I was recently asked to bake a cake and cupcakes for a friend's God son's christening. She had no requirements other than the amount of cake, so I had free reign to come up with an idea. I had seen (and bought) some lovely chocolate buttons that looked like real buttons, and thought it would be lovely if I could make some coloured ones. (The ones I bought before were from Vintage Chocolate buttons by Hotel Chocolat, and they make lovely gifts.

So, with my friend's approval, I ordered a silicone mould tray from eBay to make my coloured buttons and two bags of Candy Melts - one blue, one bright green. Candy Melts are super easy to use - just melt them like ordinary chocolate. I did mine in a bowl over a pan of simmering water. The first batch I made I used a teaspoon to put the melted Candy into the mould, but this meant the first few had bubbles of air trapped at the bottom/top of the button. 


You can see the air bubbles in this first batch.

So, the second batch, I used a paintbrush from my cake decorating kit to fill the mould slowly, making sure the Candy Melt went to all the edges of each button leaving no bubble holes. I used the back of a dinner knife to level each button off, as some of these will sit flat on the top of the main cake.


I'm really pleased with the results of these buttons. I've used silicone moulds before, but individual ones, which I've pressed sugarpaste into and turned out to leave to set. This way is so much quicker, especially as the Candy Melts only take a matter of minutes to set. Highly recommended. 

Selection of green and blue Candy Melt buttons.

Update: I thought you'd like to see the buttons finished on the cakes. I used the bigger ones on their own on a cupcake, and the smaller ones as toppers for the larger cake. I think they look quite effective, and I'm very pleased!

Chocolate cupcakes with vanilla buttercream, and a Candy Melt button!

6 inch chocolate cake with cherry jam and vanilla buttercream filling, sugarpaste icing, and Candy Melt button decorations. 


Friday, 22 June 2012

Crochet bear baby gift

We spend more of our time in work than almost anywhere else, so when you have good people around you it really does make life easier.

Today, we said a temporary good bye to a very good person to have around you, as our friend (and colleague) Jen left to have her baby. It only seems about 5 minutes since she announced her pregnancy, but yet here we are, 6 months later and there's only two weeks before the little one arrives.

We did a collection, and really splashed out on some lovely things. But some of us also got our own little gifts, and I wanted to use my new found crochet skills to create something special.

Until now I had been crocheting from patterns I found on the Internet, but I recently bought a book of crochet - Cute & Easy Crochet by Nicki Trench. I got it from our work drop from The Book People for the absolute bargain price of £4, and had a flick through almost every day planning projects.

The bear pattern really stood out, and even though it was in the section with the highest level of difficulty, I had a good feeling about it, as the pattern looked fairly simple.

As Jen doesn't know the sex of her baby, I decided a neutral colour was the way to go, and really thought that a cream bear would be very lovely, so I got some nice soft double knit wool from Leeds Market, and off I went.

Bear was constructed in two main sections for body and head, stuffing each before the crochet is finished. Eyes are added before the head is stuffed, and I bought a bag of safety eyes from Hobbycraft rather than stitching eyes on. The ears were stitched as four individual pieces. Each ear was assembled by double crocheting two pieces together, and then stitching onto the head with more wool (I used the loose ends to do this rather than cut fresh wool). Here is the body and head, once the ears had been assembled:


You can see his little face starting to take shape here, but to complete his personality, he needed a nose and a mouth. My other hobbies helped here. I like to embroider, but also in the past have had a go at making teddy bears. This was during the phase my Mum went through of making jointed teddy bears, and I used one of her books to make a couple of very simple non-jointed mini-bears out of some offcuts of mohair she had left. Anyway, the point is that as part of this crafting I learnt how to embroider noses and mouths on bears. This came in very handy as I free styled this little guy's face. After embroidering the expression on, I drew the thread through his head to come out where the head will be stitched onto the body, so I could tie a knot, and hide it in the join. You can just see the thread hanging down under the head in this picture of his finished face:


Once his head was finished, all that was left was to stitch him together. I had already crocheted 4 arms and legs. This was actually quite tricky. The trouble was that after the bit of instruction for the paw, the leg/arm bit was just left to the crocheter to complete and keep going until the limb was 12cm long. So it was quite tricky to match them up. In the end I tried to match the arms and legs to be fairly even and as luck would have it ended up with two that were slightly thinner and longer (used for arms) than the other two (used for legs).

Then I just had to position the limbs on his body and stitch! I finished him off with a fetching green bow (baby neutral again!), and he was ready to meet Jen and her bump!


I was a little bit sad to see him go, but I know that Jen's little one will be the best parent for him in the future! (And I might make one of my own!)

Thursday, 24 May 2012

Crochet baby elephant

I am 32. In general, this means my partying days are sadly pretty much all done with as I'm too poor (thanks mortgage), and nightclubs are loud noisy places (yes, 32 going on 62!). It also means that not only are lots of my friends getting married, but nowadays lots of them are starting families too.

So, inevitably I'm getting more and more invitations to baby showers. I love a nice baby shower - gossip with the girls, yummy food, and an opportunity to buy or make cute presents for mum and/or baby. And for the baby shower I went to this weekend, I really want to make use of my new crochet skills.

I don't yet have a book or any patterns (although my first book is due this week from The Book People), so I turned to the trusty internet to find the perfect pattern. I eventually chose this baby elephant pattern from the Red Heart Yarns website.

Given the trials of my rose and mouse patterns learning the correct terminology for the stitches I needed, the first thing I did was check which region it was. It was US, so I made sure that the reference sites I picked for reminding me how to do particular stitches were from the US. I had to do this a couple of times, and made a few errors along the way! Particularly with the body (see picture below), and the bonnet, which I abandoned when I realised it was so small it was for an elephant at least half his size!

Rather than buy the branded wool suggested, I went to a couple of the wool shops on Leeds Kirkgate Market, and chose a lovely grey double knit (100g), and some smaller balls (25g each) of a different brand for the bonnet and eyes. This proved to be a mistake which I will explain later.

The pattern itself was fairly simple, but required me to count the stitches a lot as they were in rounds. I taught myself an adjustable ring, which is simple to do, but fiddly to hold. I also found a video on YouTube which suggested using a contrasting scrap of wool as a marker so you don't have to count so precisely. This was a particularly good tip for crocheting in the evening in front of the TV so as long as you get the rhythm right (e.g. sc in next 2 sc, 2 sc in next sc, repeat x5 etc) you don't need to worry about the counting so much. Event better, if you do lose count you can just go back to the start of the row/round and then you can carry on. More than once I had to bin bits I'd started before I started using a marker. Never again!

The Pattern consisted of a head piece:


...body piece: (shown here on the left next to the one I did wrong! Was using slipstitches and only going through one side of each stitch (this will make sense to fellow crocheters)) 


...and four arms/legs:


Ears were added straight onto the head. So far, so simple. The stuffing of the head was added before the trunk was crocheted, as was the stuffing of each arm/leg. The body was stuffed later just before stitching the sections together.


Most of these were made just with single crochet (US). The bonnet was made in a round again, but this time with half double crochet (US). It had been a while since I had done this stitch (in the rose) so after messing up the first version I made a quick trip to the learn to crochet webpage from Lion brand again to remind me how to do it. Then I was off. I also had to add a second colour for the tie, and gaps for the ears.


When finished, it looked too small for the ele's head! Then I realised - by using different brands of wool, I had inadvertantly bought wool which was thinner than the grey, resulting in smaller stitches and guage. However, it stretched just enough to fit on his head. I added a yellow gingham ribbon for extra cuteness!


I was quite pleased overall, even though at first I was worried he wasn't as cute as the picture (possibly down to me moving away from recommended wool, guage too loose or stuffing him a teeny bit too tightly). But he went down a charm with the parents-to-be, and that's the main thing. Hopefully their "Lentil" will like him too when he or she arrives!

I REALLY enjoyed making him, and I cannot wait to stuck into my new crochet book (bought more wool in Leeds this weekend!). Watch this space...

Sunday, 20 May 2012

Learning to crochet

In previous posts I have talked about my love of crafting, particularly baking and sewing. I like to think I got my passion for cooking from my Granny Peel. Her cooking was always fabulous, and I still have her old recipe file. I also have a Mason Cash mixing bowl and a small Cornishware collection, inspired by memories of cooking with Granny (and the vintage feel I love).

My love of sewing definitely comes from my Mum and Granny Clark. Mum has always done embroidery and things, and made some clothes when we were little, and Gran made my ball dress for my 6th form ball many moons ago.

But Granny Clark’s main craft was knitting. I have tried many times to get into knitting but other than making my baby cousin a bootie, mittens and hat set (21 years ago!!!), I just can’t get into it, or remember how! 

At Christmas a friend of mine and fellow blogger mentioned she was making crochet Christmas star decorations, and I was struck with a longing to be able to make some myself. I didn’t get around to trying until a few weeks ago, when on impulse I bought a crochet hook and some wool in Leeds market to while away some time while my boyfriend did some studying. So, armed with my hook and wool, and trusty Google, I set about learning to crochet.

I firstly managed to cast on and do some Double crochet.


Then, I moved on and did some Treble crochet. (Or did I? More on that in a min).


Project 1 - Rose
Using my favourite new social media site, Pinterest, I found a lovely crochet rose pattern to do, using this pattern. It claims to be easy, and I think it is, particularly because there are two sets of instructions to help those of us who aren't familiar with the stitch abbreviations yet. I managed it not too badly.

Close up detail of rose petals.

The rose before construction.

I then realised I didn’t have a wool needle, so eBay to the rescue, and I got on with the mouse described below. When my needle arrived, I followed the instructions to create this gorgeous rose. I might add leaves when I can find some green wool I like – the stuff in the market this afternoon was too bright.

Project 2 - Mouse.
Again through Pinterest, I found this cute mouse pattern. I settled down, and using the stitches I had learnt, I got on and made this up to about row 14, but it was looking a bit, well, BIG!


 It was then that I realised I’d read somewhere that US and UK stitches are different, and lo and behold a quick check of Wikipedia told me that I was right. I had actually learnt [check UK stitches learned], and on checking the rose pattern was US, and the mouse was UK. So, back to the internet for UK instructions to make sure I was doing it right, and off I went. Much better! This is what the mouse looked like with his body finished:


However, I've since discovered that this is STILL not right, so I will have to persevere and see how I get on. I have had another project on the go I just finished as a present so will get the pictures on the computer, and come back to blog about that. The mouse has frustrated me too much to come back to just yet, but one day I'll maybe get him right!

*sigh*

Sunday, 6 May 2012

Handmade with love

Those who know me well will know I'm happiest when I'm making something. Whether it's cooking, sewing, embroidery, or as of a few weeks ago, crochet (more on that in another post...), I just love making things.

Trouble is, if I kept everything I make for myself, I'd have no room in my flat (ahem!). But I have discovered that even if you spend only a few pounds on materials, people are genuinely really chuffed to receive something homemade.

I thought I'd share with you some of the things I've made as gifts over the last couple of years. Most were made for presents for Christmas 2011, and the first few are all from the GORGEOUS Cath Kidston book, "Sew". (HIGHLY recommended either as a gift for a crafty person, or for yourself if you fancy a go at sewing).

This is a handbag I made using the pattern for the bag which comes as a free kit with the bag, combined with the closure from the alternative design. I made two of these in different patterned fabric as presents for my two best friends. (Both were very pleased with them!)


This next one is the jewellery roll from the book. I made this for my Mum, as she and Dad go away a lot on their motorbikes so I figured she might need something to keep her bits and bobs safe and secure. It was quite fiddly and time consuming to make, but I was very happy with the finished result.


My Gran used to do a lot of knitting, so the obvious choice for her was a knitting needle case. I also made one last Christmas for my boyfriends Gran, and was really chuffed when she showed me the case in use, stuffed full of all her knitting needles and crochet hooks. She was quite surprised they all fit! This one is the one I made for my Gran.


I really do love making gifts, whether they are sewn or cooked, baked, preserved etc. and there will no doubt be more later in the year.

Monday, 23 April 2012

Pineapple chutney

Every year for the last few years, around July, I get a bit excited about Christmas. This might seem early to most people, but for me, it's the perfect time for a few reasons. Firstly, it means I can budget properly for everyone's presents, and secondly, it gives me plenty of time to plan homemade gifts, especially if I need to sew anything.

By September/October I'm really in the swing of things, thanks largely due to the October/November issue of BBC Good Food Magazine coming out with Christmassy things, usually including some homemade gift style goodies. 2011 was no exception, and I used the three issues in October, November and December to make some lovely gifts. Soemtimes, if I'm lucky, there'll be enough of the gifts for me to have one of my own, or I'll try and wangle a try of some of one of the gifts. This is exactly what happened with last year's chutney, the pineapple chutney from the November issue.

I took some to my Mum and Dad's as part of their Christmas presents and we had some lovely cold ham with this chutney, and although there were only four of us, we ate the whole jar! (To be fair it was a smallish jar, but even so!). I've been planning ever since to make some more, and so this Sunday, with an hour and a half to spare, I got going.

I usually get in a terrible mess if I don't plan ahead, so I started by measuring out all the dry and liquid ingredients, and chopping the ginger.


Then I prepared the pineapple by cutting of the hard skin and then cutting out the little eyes. Thankfully, there was an article in the May 2012 BBC Good Food Magazine about how to prepare a pineapple, and this included the tip of cutting the eyes out in a diagonal. Not only does this look pretty, it's SO much easier! Thank you BBC Good Food!


Finally I sliced and cored the pineapple and chopped the flesh into small chunks. This was followed by chopping up three onions (meant to be three red, but one of the red onions was mushy inside, so I used a white one instead).

Preparation is the hardest bit; the rest is super easy and anyone could do it. To make the chutney, you firstly fry the onion and the spices in some sunflower oil for about five minutes. Then throw in the rest of the ingredients and leave to simmer for an hour.


Whist this was happening, I sterilised three jars from my (frankly too large) collection of empty jam and chutney jars I hoard for jam and chutney making. I did this by washing in hot soapy water, then popping in the oven on Gas 1/4 for the last half hour of cooking. Then when the chutney's cooking time is up, I spooned the hot chutney into the hot jars and left to cool before popping the lids on.

I cannot tell you just how yummy this chutney is. It works fabulously with ham as I said at the beginning of this post, and I reckon it'd be equally gorgeous with some sharp cheese like Wensleydale or mature Cheddar on some crackers. I can't wait to eat it...